
You may have noticed that I changed my blog layout again. I tend to do that every couple of months or so. You see, I’m always trying to make it look easier on the eyes–mine and yours. And, yes, I do get bored with my blog layout A LOT.
Now, a web designer I am not, though that is definitely on my top 3 of things I want to be, right below published author and just above skilled seamstress. I don’t know how to design a blog or website from scratch, but I understand enough about html and I use what little knowledge I have to make a few tweaks here and there. See, you don’t need to be a web design wiz in order to come up with a nice and original-looking blog.
In this post, I’m going to let you in on my mad blog designing secrets by taking you through the process of how I ended up with this new blog design all by my-“non web designer”-self. *beam*
Picking a base template
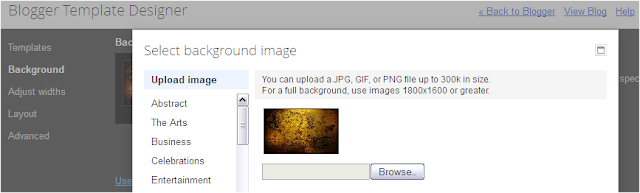
The first thing I do when I’m about to change layouts is to choose one of the available Blogger templates that is closest to the look I want. For this one, I used a Simple template (the 6th from the left), and made the initial customizations like layout, widths, page text font, link colors, title colors, and what not. This is pretty easy to do on Blogger.
Choosing a cool header
For me, a great header is the single most important aspect of the look of a blog. What your header looks like can make a huge difference. It adds personality and originality to your blog. You could be using a common template that everyone else is using, but still stand out because of your header. Recently, I stopped using an image for my header and just used images for my navigation links. That way, I can have a straightforward header, but still spice up the top part of my page with personalized images.
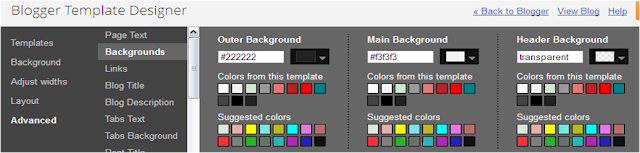
In this latest look, what looks like the header background is actually the blog background (which I uploaded via the Blogger Template Designer panel). And I just selected “transparent” for the header background so that my blog name will just appear as a simple text against the image background.
Sometimes I like to try out different fonts in Word before editing my template. The font I’m using for my blog name isn’t in the font options in the Blogger Template Designer, so I tried editing the HTML and manually putting in the font name, but I couldn’t get it to work. I just decided to create an image of my blog name in text with a transparent background. I did this using Paint. I didn’t know how to do this before until I googled it some time ago. I tell you, future mad blog designers, Google is your friend! After creating the image of my blog title (in the font I wanted!), I simply uploaded it via the Layout panel in Blogger (Layout > Header > Upload image).
Creating my cool image navigation links
I started by adding an HTML/Javascript gadget in the Layout panel and putting in the code for clickable images. I learned how to do this after years of tinkering with blogger templates. It basically involves embedding images and putting in the link. To make things easier, I simply created a draft post, uploaded the images I wanted, and just copied the html. Voila. I wanted some kind of animation or effect so I asked my best friend Google for tutorials. Google spit out this link and this link. I actually had to use the two tutorials to figure out how to do the “bumping up” effect.
Editing the post background and post date header
I had to manually edit the post background and post date header for them to look like they do. I just changed or added background colors in HTML. I also had to edit the padding and margin measurements to get the format that I wanted.
Editing the page footer
In the Simple template I used, the page footer has the same background and overall look with the main content, meaning the posts and the sidebar. I wanted my page footer to look just a tad bit different so I had to edit the HTML of my template. I looked for the footer part and made a few tweaks. I used the code for the blog background for the footer background, and I borrowed the footer format of a different template, specifically the first Picture Window template, for the transparent background of the footer widgets. Copy-paste FTW! Hah. Anyway, I also had to manually edit the text and link colors for the footer.
So, basically, that’s it. These are the things I did to go from Simple Blogger template to Whoa Original Personalized Blogger template. I know this post probably doesn’t make too much sense if you really have no idea about HTML and codes and stuff. It helps if, like me, you’re really interested in learning these things. I still don’t know a lot, but I try to learn new bits every once in a while.
By the way, this post doesn’t really help WordPress users much, but I think these last few tips can be helpful for all wannabe blog designers like me. Having said all that, how DO you acquire mad blog design skillz?
- Make Google your best friend! There are literally thousands of tutorials available on the net and if you want to know how to do a simple re-design or customization, Google can find it for you or rather you can find it through Google.
- Master the art of Copy-Paste! Since I can’t build a template from scratch, I just copy bits and pieces from different templates. Say, if I like the overall look of a template, but prefer the look of the tabs of another template, I just copy the tabs part and paste it over on my first template. I’ll need to tweak and edit a bit to make sure the codes align, but basically that’s how easy it can be.
- Never be afraid to experiment! I’ve been experimenting with my blog since forever and that’s how I learned how to do itty bitty tweaks and what not. I also learned a few nifty tricks along the way. One thing I did before was to create a dummy blog just so I could experiment with layouts and HTML.
- Spend time on the blog header! Like I said, sometimes a good blog header is all you need for your blog to look original and well-designed.
- Let your personality shine! For me a good blog design is one that shows the personality of the blogger. It’s hard if you want your blog to look like someone else’s.
Wow, this post has gotten really long. I don’t really do a lot of these posts about blogging technical things. If you read this far, thanks. Haha. If there’s anything you want me to explain further, do let me know. ;)
Thanks you for the 411 ! This was great and I definitely needed to read some of the html stuff !
& I am doing a Stella & Dot necklace ($198 value) giveaway on my blog and would love you to check it out !
Er, you’re welcome! Haha! Thanks for dropping by! :)
Imma check out your blog now. :)
Great post – I love your tip on the navigation links – I need to try that some time!
Thanks! I love clickable image effects! :P
thank you so much for sharing this! im a so ignorant when it comes to html and all that shebang, still have to let this simmer though but im hoping ill be able to use the info you shared :)
Thanks for dropping by! I hope this post helped you in some way. :)
You’re pretty amazing for “a web designer you are not” haha. I like your blog layout, and I’m glad you actually understand that it’s best to make it easier on the viewer… it seems like too many people have too much going on– it actually will deter me from going back again if a page is too busy or unorganized! Great post. I love the cool navigation links! Thinking about redoing mine now!
Thanks!! Blogs with so many things going on also frustrate me. :) I actually like your blog layout, too. Your header is one of my all-time favorites! :)
@Krissy: Haha I witnessed those changes! :) I think I changed mine three to four times in the last couple of months! :P
I also get bored with my layout easily. The most number of times I changed it was last February though. I changed it six times! :D